[23.09.25] 40일차
<<진도>>
Front-end
[Java Script]
- 객체 object 축약표현
- DOM 접근 (특정 element 찾아가기)
- event (jQuery / listener)
- form
<<Java Script>>
- 자료형
- 변수 선언
- 연산자
- 대화상자 : 창(경고, 확인, 입력)
- 조건문 : if, switch
- 반복문 : while, do~while, for
- 함수 정의 및 호출
: JS는 함수형 언어
- 변수 종류
- DOM 접근
<<오늘의 팁>>
- window + . : 이모지띄우기
- css 속성값 :
transparent : background 색을 완전 투명하게
initial : 초기값
* object 객체 축약표현
<h1>객체 축약 표현</h1>
<script>
// 객체 : Object
const name = '홍길동';
const age = 25;
// name(키)과 value(값) 가 같을 때
// const obj = {
// name: value, (property)
// name: name,
// age: age,
// }
// 축약
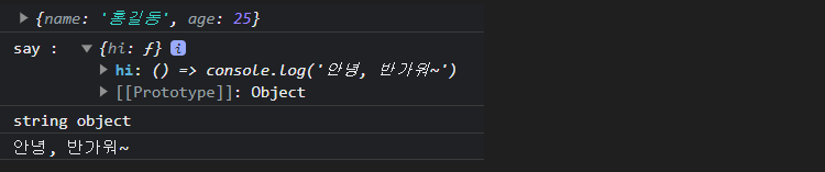
const obj = {name, age};
console.log(obj);
// value값이 익명 함수인 경우
// const say = {
// hi: function (){
// console.log('안녕, 반가워~');
// },
// }
// const say = {
// hi() { console.log('안녕, 반가워~') },
// }
// 화살표 함수
const say = {
hi: () => console.log('안녕, 반가워~')
}
console.log('say : ', say);
console.log(typeof 'say : ', typeof say);
// object 와 Object 는 다르다. // O, o
say.hi();
</script>
=======================================================
=======================================================
* ex01-dom (DOM 접근)element 추출 (반환)
[HTML]
<body>
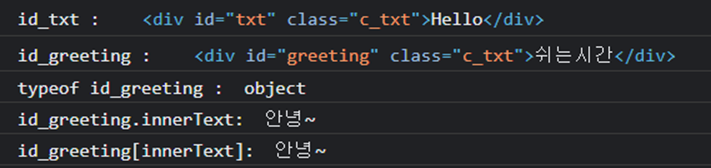
<div id="txt" class="c_txt">Hello</div>
<div id="greeting" class="c_txt">안녕~</div>
<hr>
<script src="js/ex01-dom.js"> </script>
</body>
=====================================================================
** element 추출
1. 단일 element 추출(반환)
1-1) document.getElementById(‘아이디’);
1-2) document.querySelector(‘선택자’);
아이디 : #아이디
클래스 : .클래스
태그 : 태그
2. 복수 element 추출(반환)
2-1) document.getElementByClassName(‘클래스’);
2-2) document.getElementByTagName(‘태그’);
2-3) document.querySeletorAll(‘클래스’);
document.querySeletorAll(‘선택자1’, ‘선택자2’);
=====================================================================
[JS]
** 단일 element 추출(반환)
// 1. 단일 element 추출(반환)
const id_txt = document.getElementById('txt');
const id_greeting = document.querySelector('#greeting');
// 1. 단일 element 추출(반환)
console.log('id_txt : ', id_txt);
console.log('id_greeting : ', id_greeting);
console.log('typeof id_greeting : ', typeof id_greeting);
console.log('id_greeting.innerText: ', id_greeting.innerText);
console.log('id_greeting[innerText]: ', id_greeting['innerText']);
** 복수 element 추출(반환)시 선택자(참조주소) 들어있는 배열 형태로 반환
// 2. 복수 element 추출(반환)
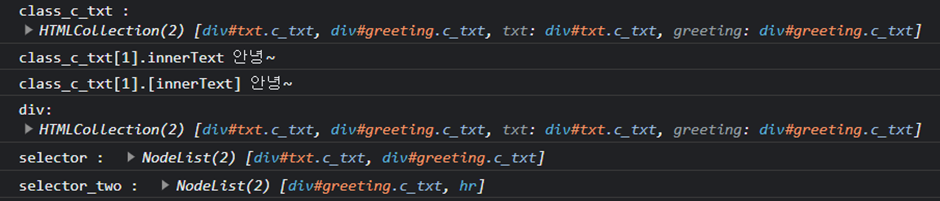
const class_c_txt = document.getElementsByClassName('c_txt');
const div = document.getElementsByTagName('div');
const selector = document.querySelectorAll('.c_txt');
const selector_two = document.querySelectorAll('#greeting, hr');
// 2. 복수 element 추출(반환)
console.log('class_c_txt : ', class_c_txt);
console.log('class_c_txt[1].innerText', class_c_txt[1].innerText);
console.log('class_c_txt[1].[innerText]', class_c_txt[1]['innerText']);
console.log('div:', div);
console.log('selector : ', selector);
console.log('selector_two : ', selector_two);
selector_two[0].innerText = '쉬는시간';
- getElement ~는 HTMLCollecton()[]
- querySeletorAll은 NodeList()[]
* ex02-dom
[HTML]
<body>
<h2 id="title">제목</h2>
<div id="append"></div>
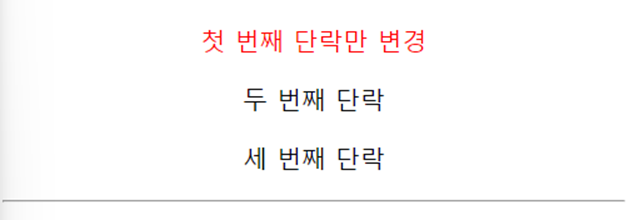
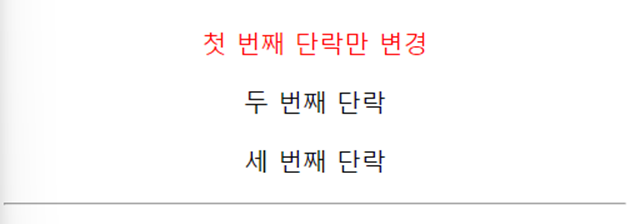
<p class="paragraph">첫 번째 단락</p>
<p class="paragraph">두 번째 단락</p>
<p class="paragraph">세 번째 단락</p>
<hr>
<script src="js/ex02-dom.js"></script>
</body>

[JS]
const title = document.getElementById('title');
console.log('title >> ', title);
console.log('title.innerText >> ', title.innerText);
title.innerText = '변경된 제목'; // content 변경
=================================================================

=================================================================
//
const append = document.getElementById('append');
// document.getElementById('append').innerText = '안녕';
// console.log('append >> ', append);
// append.innerText = '<h3>추가된 제목</h3>';
// HTML 형식으로 content 추가/수정
append.innerHTML = '<h3>추가된 제목</h3>';
console.log('append >> ', append.innerHTML);
console.log('append >> ', append);
============================================

============================================
//
const selector = document.querySelector('.paragraph');
console.log('첫 번째 단락 접근');
console.log('selector >>', selector);
=====================================================================================

=====================================================================================
selector.innerText = '첫 번째 단락만 변경';
selector.style.color = '#f00'; // .style 통해 css 스타일 속성 접근가능

// 여러 개체 중 특정 element 선택 방법
const paragraph = document.getElementsByClassName('paragraph');
// [방법 1]
paragraph[0].style.textAlign = 'center';
paragraph[1].style.textAlign = 'center';
paragraph[2].style.textAlign = 'center';
// [방법 2] for of문
console.log(paragraph);
for (let s of paragraph){
s.style.textAlign = 'center';
}
================================================================

================================================================
// [방법 3] 함수 정의
const setTextAlign = function(args) {
args.style.textAlign = 'center';
};
for(let para of paragraph) {
setTextAlign(para);
}
// [방법 4] forEach 함수
// paragraph.forEach(); // Error!
/* forEach()는 배열요소를 반복하고 각 요소에 대해 주어진 콜백 함수를 호출 */
// 콜백함수는 세 매개변수를 가진다
// 1. value : 배열요소의 값
// 2. index : 배열요소의 index
// 3. array : 원본배열 그 자체
// 배열로 변환
const arr_paragraph = Array.from(paragraph);
console.log('arr_paragraph >>', arr_paragraph);
=================================================================

=================================================================
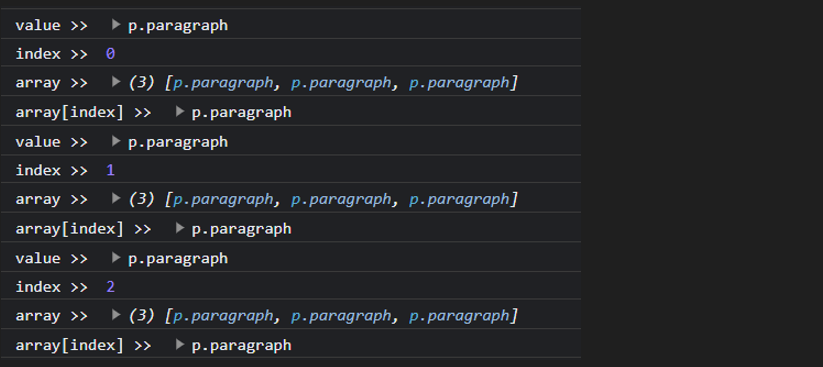
arr_paragraph.forEach(value => value.style.textAlign = 'center');
== 확인용 ==
arr_paragraph.forEach((value, index, array) => {
console.log('value >> ', value);
console.log('index >> ', index);
console.log('array >> ', array);
console.log('array[index] >> ', array[index]);
});
========================================================================
========================================================================
* ex03-event
[HTML]
<body>
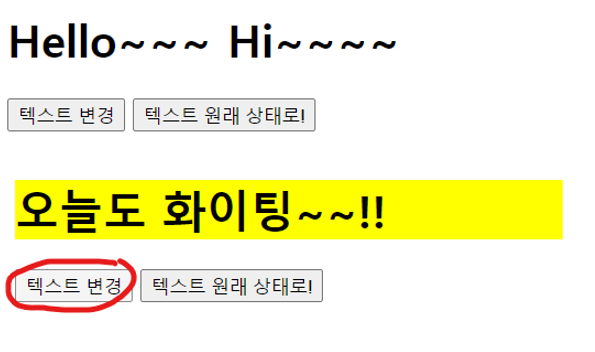
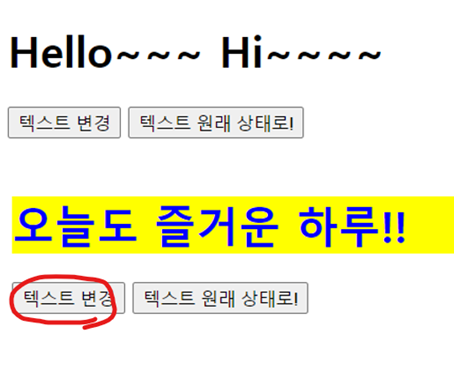
<h1 id="greeting">Hello~~~ Hi~~~~</h1>
<button type="button" onclick="textChange();">텍스트 변경</button>
<button type="button" onclick="textBefore()">텍스트 원래 상태로!</button>
<script src="js/ex03-event.js"></script>
</body>
[JS]
const element = document.getElementById('greeting');
console.log(element);
const initialText = element.innerText;
// element.innerText = '안녕~';
// [방법 1]
function textChange() {
element.innerText = '오늘도 화이팅~~!!';
element.style.backgroundColor = '#ff0';
}
function textBefore() {
element.innerText = initialText
element.style.backgroundColor = 'initial';
}
* ex04-event-jquery
** jQuery
[HTML]
<head>
<title>이벤트</title>
<meta charset="UTF-8">
<meta name="viewport" content="width=device-width, initial-scale=1.0">
//*** JavaScript 라이브러리 jQuery
<script src="https://code.jquery.com/jquery-3.7.1.js"></script>
</head>
<body>
<h1 id="greeting">Hello~~~ Hi~~~~</h1>
<button type="button" id="textChange">텍스트 변경</button>
<button type="button" id="textBefore">텍스트 원래 상태로!</button>
<script src="js/ex04-event-jquery.js"></script>
</body>
[JS]
/*
JQuery
$('선택자');
$('선택자').함수();
*/
// id가 greeting인 element 접근
const greeting = $('#greeting');
console.log(greeting);
const initial = $('#greeting')[0].innerText;
console.log(initial);
// 텍스트 버튼을 클릭하면, h1의 텍스트 변경
$('#textChange').click(() => {
// $('#greeting').html('오늘도 즐거운 하루!!');
// $('#greeting').css('background-color', '#ff0');
greeting.html('오늘도 즐거운 하루!!')
.css({
'background-color': '#ff0',
'color': '#f00'
});
});
$('#textBefore').click(() => {
greeting.html(initial)
.css({
'background-color': 'initial',
'color': 'initial'
});
});
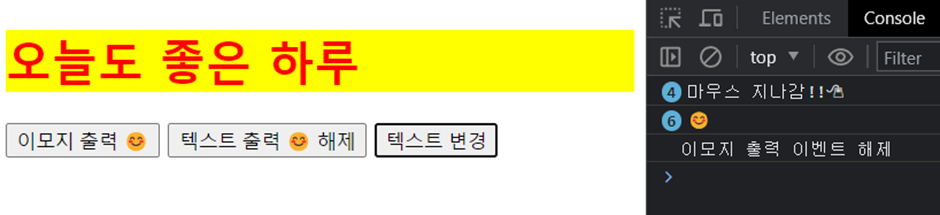
* ex05-listener
[HTML]
window 이모지 win+.
<body>
<h1 id="greeting">Hello~~~ Hi~~~~</h1>
<button type="button" class="emoji">이모지 출력 😊</button>
<button type="button" class="remove">텍스트 출력 😊 해제</button>
<button type="button" class="textChange">텍스트 변경</button>
<script src="js/ex05-event-listener.js"></script>
</body>
[JS]
** addEventListener(‘이벤트’, 이벤트핸들러(콜백함수임));
- 이벤트 리스너 : 이벤트가 발생했을 떄, 그 처리를 담당하는 함수
- 이벤트 핸들러(handler) : 이벤트 감지 후, 실행되는 함수
const emoji = document.querySelector('.emoji');
const h1 = document.querySelector('h1');
const remove = document.querySelector('.remove');
const textChange = document.querySelector('.textChange');
// << 이벤트 리스너 등록 >>
// [ 문법 ]
// 엘리먼트.addEventListener('이벤트', 이벤트핸들러(콜백함수임));
// 이벤트 리스너 : 이벤트가 발생했을 때, 그 처리를 담당하는 함수
// : 이벤트핸들러(event handler) - 이벤트 감지 후, 실행되는 함수
emoji.addEventListener('click', emojiHandler); // click : 클릭 시
remove.addEventListener('click', removeHandler); // click에 대한 이벤트 핸들러remove
textChange.addEventListener('click', function(){
h1.innerText = '오늘도 좋은 하루';
h1.style.color = '#f00';
h1.style.backgroundColor = '#ff0';
})
h1.addEventListener('mouseover', () => console.log('마우스 지나감!!🖱'));
// mouseover : 마우스 오버 시
function emojiHandler() {
console.log('😊');
}
function removeHandler() {
console.log('이모지 출력 이벤트 해제');
emoji.removeEventListener('click', emojiHandler);
}
* ex06-form
** onclick=“function()” 클릭 시 함수 실행
<input type="text" name="user_name" value="우하하">
<button type="button" id="input" onclick="hi()">추출</button>
<button type="button" id="input" onclick="textDelete()">삭제</button>
<script>
const text = document.querySelector('input');
console.log('text.value : ', text.value);
const hi = function () {
console.log(text.value);
}
const textDelete = function () {
text.value = '';
}
</script>
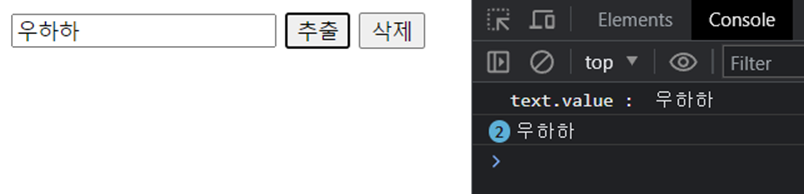
- 삭제 시 value 삭제

* 모달
// [모달]
const modal = document.querySelector('.modal');
const overlay = document.querySelector('.overlay');
const btn_modal = document.querySelector('.btn-modal');
const btn_close = document.querySelector('.btn-close');
[모달, overlay on]
btn_modal.addEventListener('click', () => {
modal.classList.add('active');
overlay.classList.add('active');
});
/*
‘classList’ : JavaScript의 DOM 요소에서 사용할 수 있는 속성 중 하나로, 해당 요소의 클래스 목록을 나타내는 속성
** classList 함수
- add(className) : 클래스를 추가합니다. 해당 클래스가 이미 존재하지 않으면 추가하고, 이미 존재하면 아무런 변화가 없습니다.
- remove(className) : 클래스를 제거합니다. 해당 클래스가 요소에 존재하면 제거하고, 존재하지 않으면 아무런 변화가 없습니다.
- toggle(className) : 클래스의 존재 여부를 토글합니다. 클래스가 요소에 이미 존재하면 제거하고, 존재하지 않으면 추가
- contains(className) : 클래스가 요소에 존재하는지 확인합니다. 존재하면 true를 반환하고, 아니면 'false'를 반환
** className에 CSS에 .active 가 들어갈 수 있다.
*/
// [모달, overlay 닫기]
// [방법 1]
// btn_close.addEventListener('click', () => {
// modal.classList.remove('active');
// overlay.classList.remove('active');
// })
// overlay.addEventListener('click', () => {
// modal.classList.remove('active');
// overlay.classList.remove('active');
// });
// [방법 2] forEach()
// 클릭 시 닫히는 element들을 배열화시켜 forEach() 함수를 사용하여 한번에 정리
const close_elements = [btn_close, overlay];
close_elements.forEach((close_element) => {
// console.log(close_element); 확인용
close_element.addEventListener('click', () => {
modal.classList.remove('active');
overlay.classList.remove('active');
});
});